Center Brake Light Flasher Instructions
By Rod Roller (CAMS)
Here is a simple diagram of how to hook up the flasher on a Miata and the parts I used. With all the needed parts on handyou should be able to install this in less than an hour. Special thanks to CAMS member Mark Hinton for the idea and hisefforts towards the same goal.
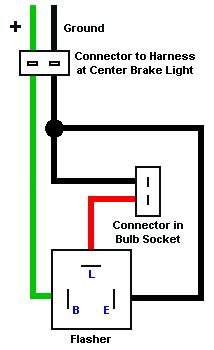 Tridon EP34-C only. For EP35-C and EP36-C reverse the green and black flasher connections. |
IMPORTANT! There are three connector blades on the flasher. Make sure you know which blade on the flasher is ground. The flashers above have the blades labeled "B", "E", and "L." On EP34-C the "E" blade is the ground(Earth!). On EP35-C and EP36-C, "B" is ground. See the blue letters in the diagram. If you get them mixed up, it will not flash. If you are not sure which one is ground, you can check it using a normal multi-tester on the DC Ohms setting. The two blades that have no resistance (zero Ohms) between them are NOT the ground! There should be some resistance between the ground blade and the other two blades. If the wires are connected as specified above, the flasher should work. If it does not flash or does not light at all then you have something connected wrong. | |||||||||||||||||||||
I managed to hook this up without cutting the factory wires. I used crimp-on terminal connectors and some spare20 gauge wire to create the wires between the factory connectors and the flasher. If you use differentcolors for the wire it will help prevent confusion when you plug it up. Check your car before buying connectors, theblades in the Miata's factory connectors are extremely narrow (1/8 inch wide) and I had a hard time finding connectorsthat small. I found some at a local electronics repair & hobby store, but I had to buy them in quantity(100!). Theflashers use a standard 1/4 inch wide blade. You can find the 1/4 inch female connectors almost anywhere, evenWal-mart.