Do-It-Yourself Bar Grille
By Steve Patterson (CAMS)
Some of you know the sickening feeling when your air conditioning quits and
the repair shop tells you a rock killed your condensor and a new one will
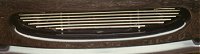
cost $450. I have just made a couple of bar grilles to go in the mouth of
the Miata. Aftermarket vendors sell similar grilles for up to $85 but you can make one yourself for about $20.
Here is how to make one yourself:
Materials Needed:
2 8ft 3/4" x 1/8" aluminum strap (Lowe's has these for $5.85 each)
1 1/2" aluminum tubing ( you will only need about a foot but I only found them available in 3 or 4 feet sections)$4.50
1 foot of 1/4" all thread $2.00
4 1/4" stainless steel cap screws $1.25 each
4 3/16" x 1/2" rivets
2 6mm x 100 phillips head bolt(preferably stainless steel)$1.00 each
masking tape
Tools needed:
10mm wrench or socket
tubing cutter
phillips screwdriver
hacksaw
drill
17/64" drill bit
3/16" drill bit
vise or other clamping device
7/16" wrench
tape measure
polishing wheel(optional)
You will be cutting 7 bars out of the 3/4" strapping. (NOTE:These measurements are for 1990-1997 Miatas only.)
The 1st is 26"
2nd 27 3/4"
3rd 27 1/4"
4th 26 1/4"
5th 24 1/2"
6th 21"
7th 18 1/2
Next make 2 L brackets out of the 3/4" strapping. To do this cut 2 pieces 1 1/2" and bend them in half.
Next you have to make the spacers. Using the 1/2" tubing, cut 12 3/8" pieces using a tubing cutter.
Next cut the all thread to 3 1/2 inches
Next measure the center of all the bars and place a piece of masking tape there. Draw a line across the bars to indicate
center. Example: The middle of a 26" bar is 13".
Next take all the bars and line up all the lines you just marked. Clamp them together using a suitable clamp or vise.
Using a 17/64 drill bit, you will then drill 2 holes all the way through the clamped bars approximately 1" from the
end of the shortest bar on each end.
From the center of the top bar, remember this one is 26", measure out 9 5/8" and mark. This is where you will
attach the L brackets. The brackets will be 19 1/4" from each other.
Clamp brackets at marked spot and drill 2 3/16" holes and rivet together
with the L bracket UNDER THE BAR!
Next drill for the mounting of the assembly to your car. Using a 17/64 bit,
drill a hole in the center of the back of the L bracket 1/4" from the top.
Depending on how well you measured, you may have to elongate the hole to
make it fit properly on your car.
Next assemble the grill . Using the all thread, alternate bar and spacer in the order seen at the top of the page.
Finish by screwing on the cap nuts.
Looking in the mouth of your Miata, take out the 2 10mm headed bolts on the
top of the mouth. If you can't find them, insert the grill and see where it
mounts. Mount the grill using the 6mm phillips head bolts.
I polished mine to a mirror finish but it can be painted(remember to use a
self etching primer on aluminum), or you can give it a brushed look with
tripoli compound and a polishing wheel.