Console Trunk Release
Temporary Disable Modification
M1(1992-1997)
By Rod Roller (CAMS)
WARNING: This modification requires the removal, disassembly, modification, reassembly, and reinstallation of the trunk mounted lock cylinder. If you are not entirely confident in your ability to do this you should not attempt it. If performed improperly, you could damage the lock enough to make it unuseable, requiring you to purchase a new lock cylinder.
10mm cresent or socket wrench
Pliers, preferably needle-nosed
Screwdriver, narrow flat blade
Dremel Moto-tool, or similar electric tool capable of grinding small metal parts, with a metal burring bit and a small round stone bit
Protective glasses
Between 1 and 2 hours, depending on your skill
STEP 1: REMOVE LOCK CYLINDER FROM CAR
When you remove the inside trunk panel the back of the lock is exposed.Twist the plastic clip downwards that holds the connecting rod, then pullthe rod from the lever arm. Now remove the E-clip (using pliers and/orsharp screwdriver) holding the lever arm and spacers, then remove the armand spacers and set them aside. Be sure to remember the order they were in!Two bolts hold the lock in place, remove them with a 10mm socket. The lockshould now be free. The easiest way to remove the cylinder is to first removethe tag light assembly closest to the lock cylinder. From inside the trunk remove the three 10mm nuts holding the tag light assembly in place. Pull the tag light straight back into the trunk. You should now be able to reach through the hole left where the tag light was to help pull the lock cylinder out.
STEP 2: DISASSEMBLE LOCK CYLINDERNow that the cylinder is free, you have to disassemble it. Be very careful or youwill lose the small parts of the lock. Remove the polished cap (where the key goesin) using a small(narrow) screwdriver. Pry under the edge of the cap wherethe three indentations are to free the cap. The cap will bend somewhat butyou should be able to get it off with out much distortion. The cap can beeasily straightened with needle-nosed pliers once it is removed. The keydoor parts will be under the cap, remove the cap carefully so you won't losethe parts, set the cap and door parts aside. Now insert the key into the lock tumbler(the center part). Look in the back end of the lock (not the key end) and notice the brass retaining tab. Use a small screwdriver to press the brass tab down,while sliding the tumbler assembly out. Be sure to hold the key in the tumbler, and slowly remove the tumbler from the outer casing. IF THE KEY COMES OUT, YOUR LOCK WILL COME APART!!! When you slide the tumbler out the brass tab will try tocome out since it is spring loaded. Carefully remove the brass tab and miniature spring and aside to prevent loss. Set aside the outer lock casing.
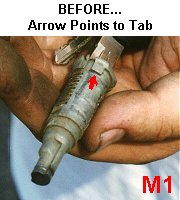
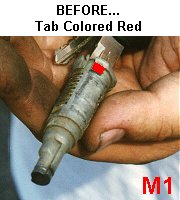
STEP 3: GRIND OFF METAL TAB PREVENTING ROTATIONOnce again I must stress: DO NOT ALLOW THE KEY TO COME OUT! Clean any excess grease off of the tumbler. Examine the tumbler and compare with the photos below to determinewhich tab needs to be removed. Use a Dremel or similar tool to grind off the raised tab shown in the photos. WEAR EYE PROTECTION WHILE GRINDING!
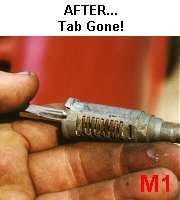
Do not carve too deeply with the Dremel.Be sure not to leave any rough edges, andclean all metal fragments off of the tumbler before re-inserting into the casing.Insert the tumbler with key still inside and verify that key now turns bothdirections smoothly. If it seems to be snagging when turningcounter-clockwise remove tumbler/key and verify that all of the tab wasremoved. If the key turns smoothly you are ready to put it back together. NOTE: Older locks may be worn enough that the brass key "bumps" may stick slightly out of the tumbler,causing snagging while turning backwards. Use a grinding stone in Dremel to slightly round the edges of the "bumps" if necessary.
STEP 4: REASSEMBLE LOCK CYLINDERInsert the tumbler COMPLETELY in the casing, and carefully remove the key leavingthe tumbler in the casing. Place the key door parts back on top of the key openingin the correct position. The spring will try to push the key door up as you try to put the cap back on. To put the cap on, place a screwdriver through the center of the cap and hold the key door down with the tip of the screwdriver.Slide the cap down the screwdriver and onto the lock cylinder. Use pliers to press the sides of the cap down if necessary, ensuring the capwill stay on the cylinder. Now insert the key and test rotation one moretime before reinstalling in car.
STEP 5: INSTALL LOCK CYLINDER INTO CARReinstall lock cylinder in car, reversing removal steps. It will bedifficult to get the cylinder back in place because the rear panel is so closeto the car. Keep trying and you will get it eventually. Once cylinder is in place, replace 10mmbolts. Replace tag light assembly. Replace spacers and lever arm on lock shaft in correct order, and secure with E-clip. Place connecting rod back in hole on lock arm and rotate plastic clip until rod is locked in place. Replace trunk inner panel.
YOU ARE DONE!To use the locking feature, the trunk lid must be closed. Verify theconsole release still works properly. Now close trunk lid, insert key, andturn key counter-clockwise. You should hear and feel a small "pop". Thisis the console release being disabled. Pull the console release, it shouldnow do nothing. Place key in trunk lock and turn clockwise, opening trunk.You will propably hear two "pops", the first is the console release beingreactivated, the second is the trunk latch opening. Close trunk lid andpull console release to verify it now opens trunk. THAT'S IT!